
How to Install Windows 11 Lite on Your PC
We are no stranger to the fact that Windows 11 is an operating system full of features and aesthetic appeal. But even though Windows 11 brings substantial upgrades, it is resource-hungry and can quickly clog up an old system to the point you cannot even run it smoothly. If you read our recent article on Tiny 10, the stripped-down version of Windows 10, you must be wondering if something like this exists for Windows 11. Well, you’re in luck because it does! We have found the lightest build of Windows 11 yet, and it can run even on the oldest systems. So grab a pen drive, and I will show you how to install Windows 11 Lite on your PC.
Install Windows 11 Lite on Your PC (2022)
While this guide will explain how to install Windows 11 Lite on your computer, it will also address some important questions you may have about this build in the FAQ section. If you would rather skip to that and read it first, then use the table below to do so.
What Is Windows 11 Lite and How Does It Work?
The Windows 11 Lite 21H2 build we are going to install has been made by YouTube creator Neelkalpa’s Tech. This Windows 11 Lite build is essentially a stripped-down version that contains just the necessary Windows 11 files required to make the OS work. The biggest upside of this build is that it can run on systems with RAM as low as 256 MB and storage as low as 10GB, which is simply insane.
However, as you would expect, most of the resource-hungry effects have been removed from this build of Windows 11 Lite, including the swift animations some users like. You will also not find other standard Windows apps, including the Microsoft Store, Windows Defender, and Xbox Services, to name a few. However, removing them has also meant Windows 11 Lite is supposed to be faster and less power-hungry. If the idea of a lightweight Windows 11 seems interesting to you, then keep reading as we show you how to install it.
Things You Need Before Installing Windows 11 Lite
As eager as you might be to install this lightest build of Windows 11, there are some things you need before we can begin. Have a look at the list below, and make sure to cross it off.
1. Neelkalpa’s Windows 11 Lite Build
Since this is a custom ISO file of Windows 11, you simply cannot install it through Microsoft. Thankfully, the creator has made it super easy to download it nevertheless. You can visit the creator’s YouTube (visit) channel and watch the linked video to get the ISO file. Download the Windows 11 Lite ISO and keep it on your desktop. When you extract the file, it will ask you for the password, which is: techbyneel.
2. Rufus and Pen Drive
Much like other ISO images, this one will need to be flashed onto a pen drive for installation. To create a bootable USB drive, we will need the utility software Rufus (Get). Simply download it and keep a pen drive handy for the process below.
Creating a Partition to Install Windows 11 Lite
No matter if you’re clean installing this Windows 11 Lite build or simply dual-booting it, you will require a partition on your computer for it. Before we proceed further, let’s go on to creating one, so we can use it in the Windows 11 Lite setup. I will use a standard Windows 11 PC for this. For those with other versions of Windows, the steps remain the same, so follow them below.
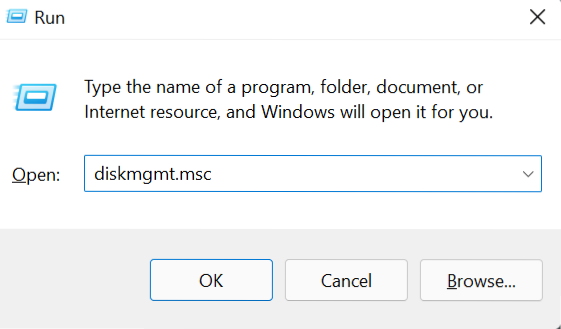
1. Use the Windows 11 keyboard shortcut Win+R to open the Run prompt. Here, type “diskmgmt.msc” and press Enter. It will open uo the Disk Management window.
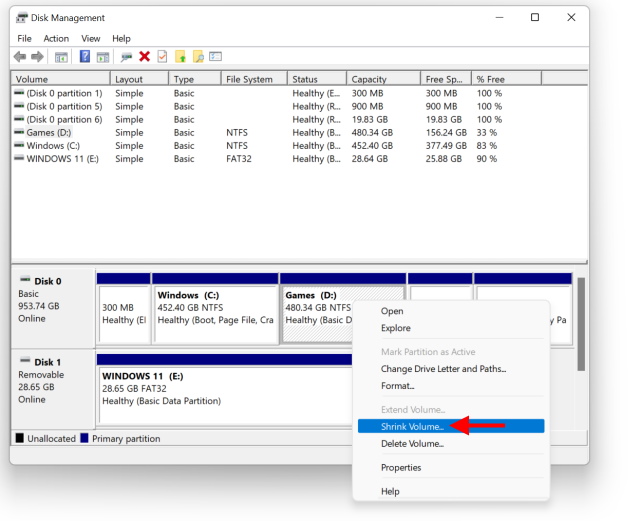
2. You will now see your hard drive and its pre-created partitions. You will either need to find unallocated space represented in black or shrink a volume and obtain some. Depending on your situation, right-click on the partition you don’t need and select either option. To shrink one, simply right-click an existing partition and then click ‘Shrink Volume‘. After that, select Shrink on the box that appears.
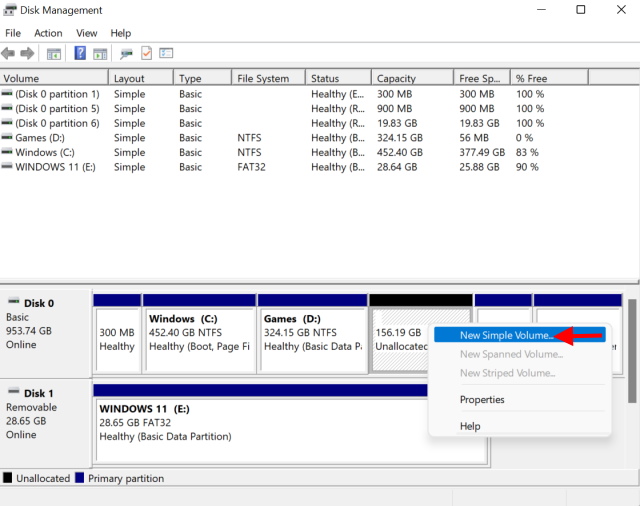
3. Once you see unallocated space, right-click on it and press ‘New Simple Volume‘.
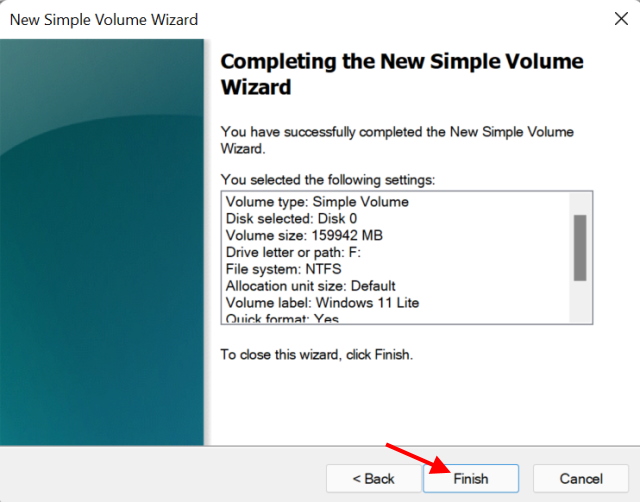
4. Follow through the set-up wizard and assign your drive a letter and a name. I am naming it Windows 11 Lite for simplicity. You can leave the rest of the settings untouched.
5. Click Finish and the new partition will be created.
With the partition now created, we are almost there. Let’s proceed to burn the Windows 11 Lite ISO image in the next section.
Burning ISO Image onto the USB Drive
We will now proceed to burn the Windows 11 Lite ISO image onto a pen drive for installation. Provided you have already installed Rufus from above, plug in your USB and follow the steps below.
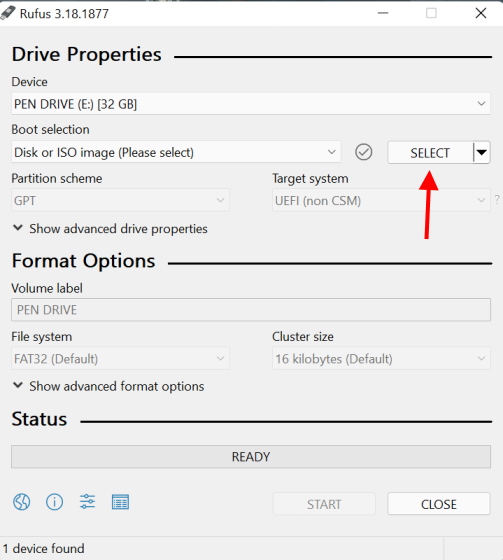
1. Open up Rufus on your computer to begin. Make sure you select your USB drive by clicking the drop-down button next to “Device“.
2. Besides boot selection, click on the “Select” button to choose your ISO file.
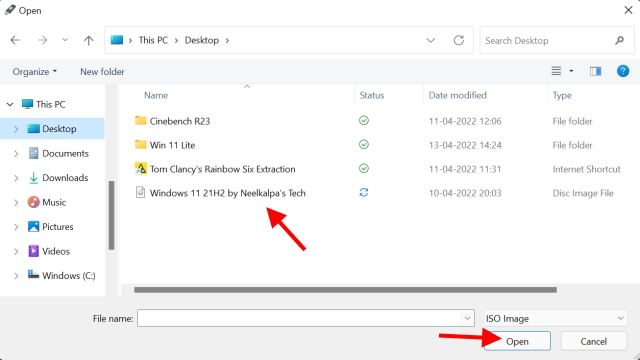
3. Navigate to the directory where you have stored your build. In my case, I have done so on the desktop. Select it and press Open.
4. Now, press the “Start” button. You do not need to change any other setting.
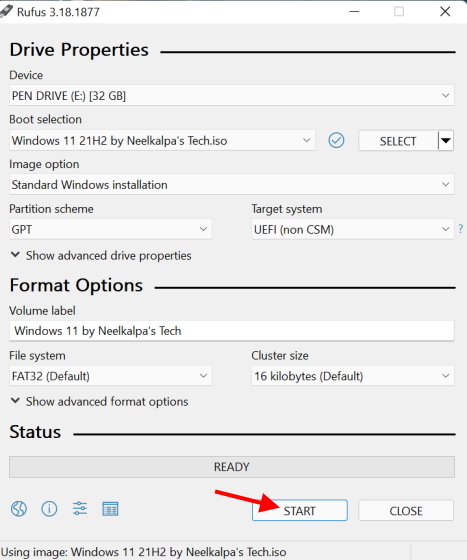
5. Press “OK” to give Rufus consent to format your pen drive.

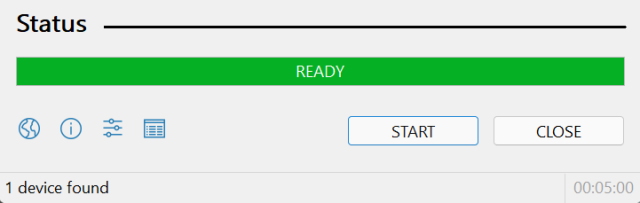
6. Depending on your PC, the process may take anywhere from 2 to 10 minutes. Once done, you will see the following message and can then press Close and eject your pen drive.
And we are ready to go. Keep reading below as we get on to the actual installation of Windows 11 Lite.
How to Install Windows 11 Lite on Your PC
Now let’s install the Windows 11 Lite build onto our PC. Before we begin, plug in the pen drive onto the target PC and shut it down. Once done, follow the steps below.
1. Press the ‘Power On‘ button on your PC and repeatedly press the BIOS button. This differs from manufacturer to manufacturer but mostly is between ‘F2, ‘F8‘ or ‘F12‘. In the case of my Asus laptop, it is F2. You can follow our guide on how to open BIOS or UEFI in Windows 11 right here.
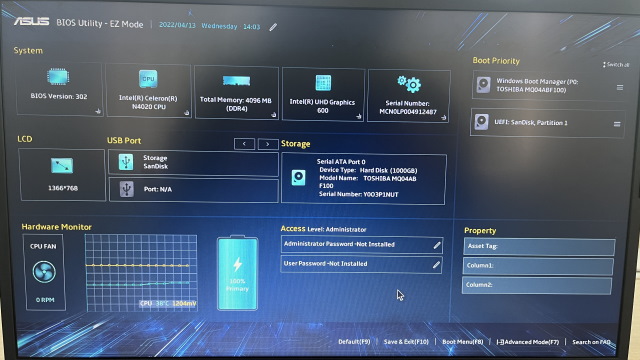
2. Once you are in the BIOS settings, find the Boot Order menu and choose the pen drive to boot from. To do that, simply hover it using your keyboard’s arrow keys and press Enter.
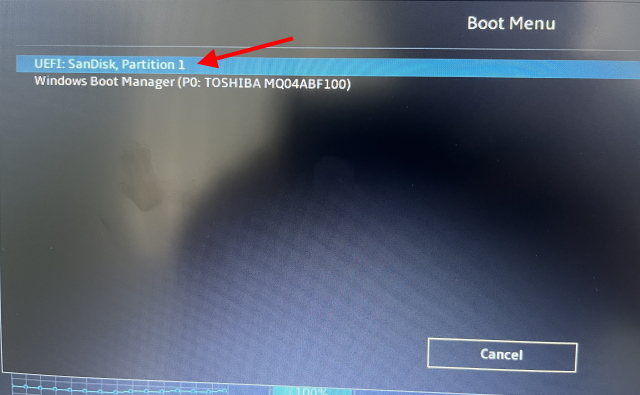
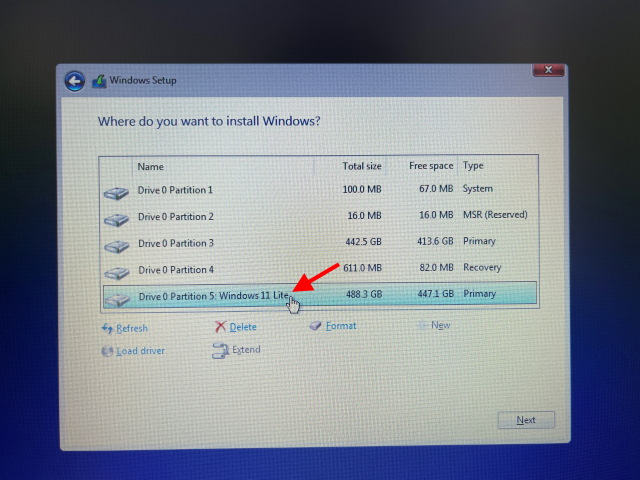
3. You will now enter the Windows setup in a few minutes, and you can follow along just as you would in a standard setup. In the partition selection screen, choose the partition we created earlier and continue.
4. Depending on your hardware, the process might take some time to complete, so do not panic if it looks stuck. Once done, your PC will restart a few times, and before you know it, you will boot to the Windows 11 Lite desktop!
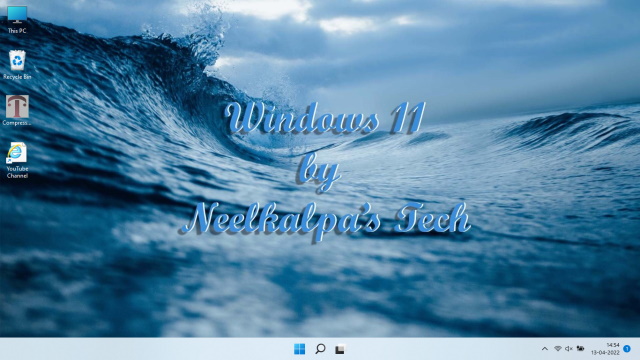
And it’s easy as that! Windows 11 Lite is now installed on your PC. While you can use it as it is, we will go on to compress it even more, so let’s do that in the section below.
Compress Windows 11 Lite Even Further
If you currently check the Windows 11 install size right now, you will see it’s a bit over 8GB. While that is much lower than a standard Windows install (~25GB), we can get it down just a bit further. Follow the steps below to do that.
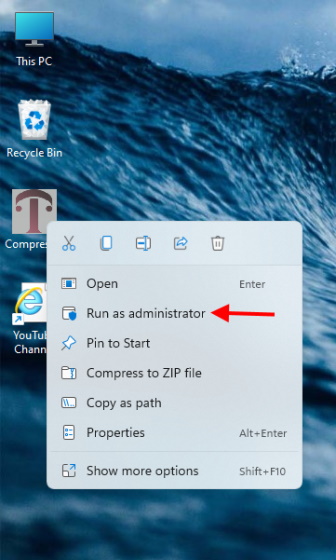
1. On the Windows 11 Lite desktop, you will see a file called ‘Compressor.exe’. Right-click it and click ‘Run as administrator.
2. The compressor will now open up and begin its work automatically. Simply leave it alone and check back in a few minutes. You will need to restart your Windows 11 to see the changes. However, before we do, let’s also go on to turn off page files to save some more space.
Note: Skip the steps below if your system has RAM lower than 512MB.
3. Double click ‘This PC” on the desktop to open it up. Right-click on its icon from the left sidebar and open up its “Properties” window.
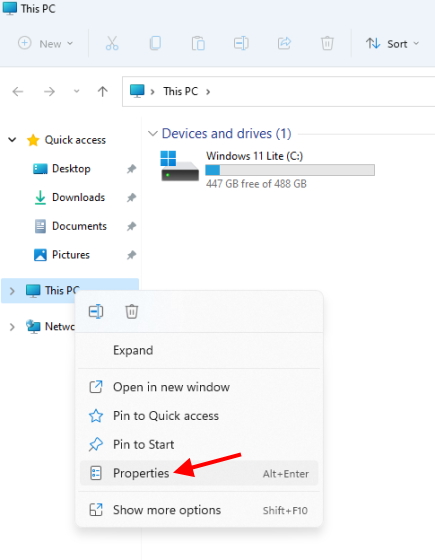
5. Scroll down and click on “Advanced System Settings” to open up another pop-up window.

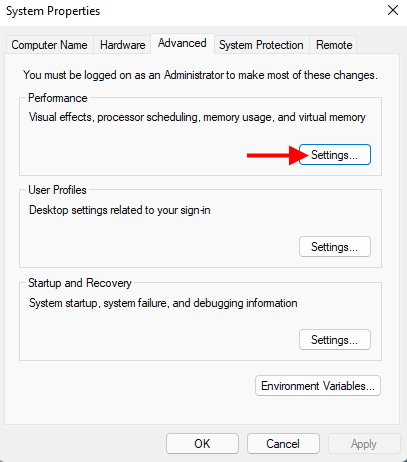
6. Under the Performance section, click “Settings“.
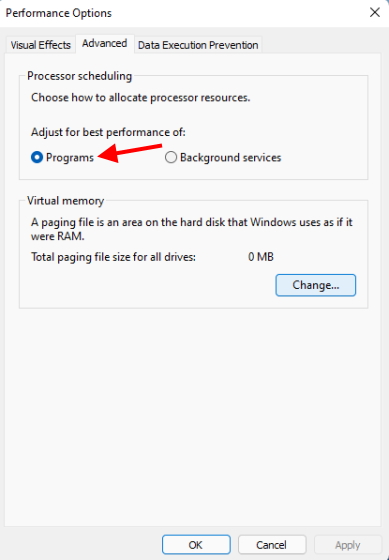
7. In the “Performance Options” pop-up window, move to the “Advanced“ tab and click on “Programs“ under the “Adjust for best performance” section.
9. Now under Virtual Memory, click “Change” and then untick the “Automatically manage paging file size of all drives” option.
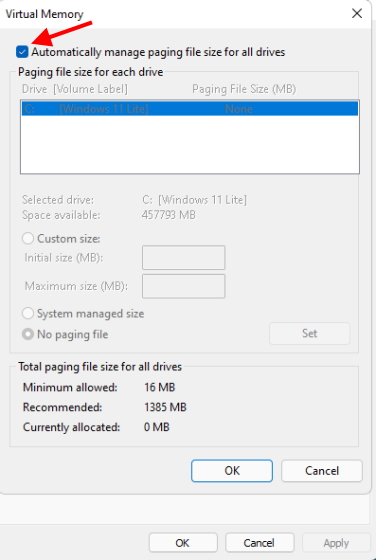
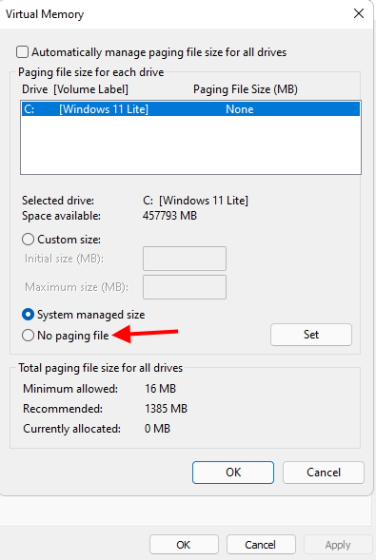
10. Now move down a bit, enable the “No paging file” option, and click on the “Set” button next to it.
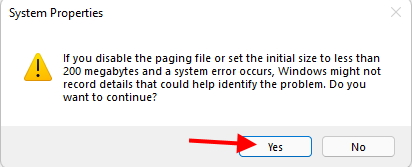
11. A pop-up window will now show up on your screen warning you about the change. Simply press Yes and then press Apply.
Restart your PC and check the file properties again. You see the installation size has been reduced even further and is now under 5GB! You can now go on to use Windows 11 Lite to your heart’s content and explore.
Windows 11 Lite: Initial Impressions
Having been using it for a few days, I love Windows 11 Lite for its light impact on the PC. Besides the extra storage that I have on my drive, the CPU and RAM usage is now even lower compared to standard Windows 11. I also did not encounter any Windows breaking bugs or glitches while using the PC. The only thing worth mentioning is that the famous Windows+Shift+S screenshot feature doesn’t work. Now as mentioned above, there are no extra apps or services on the device, which help deliver smooth performance and even better start-up times.


Comments